Food Buzz Badge

Thursday, March 29, 2012

Inspired by Color

Eleemosynary has its preview performance tonight.  I couldn't be prouder of the actors and how far they've come over the last four weeks, particularly the 15-year-old who doesn't have a lot of acting experience.  We had show photos taken on Tuesday night, and as long as you can ignore the fact the floor hadn't been painted yet, they are just gorgeous:


All  photos courtesy of Jamie Lang Photography,
http://jamielangphotography.com/
Aren't those colors gorgeous?  That's the benefit of having a visual artist do your set.  Margret Hugi-Lewis is a genius.  Her inspiration was the work of Paul Klee.

Those hues were the inspiration for one of the few things I had time to cook last weekend, since we were in technical rehearsals.  This grapefruit sorbetto is everything a sorbet should be:  tangy, lightly sweet and the perfect palate cleanser.  See what I mean about the color inspiration?

Wish us luck with opening weekend!  Although we've had our ups and downs, we are ready for an audience.  I even teared up a little last night at the end of the show, it's so darn beautiful.

A quick note on the grapefruit juice:  I used a combination of fresh and bottled.  If you are using all fresh, you should increase the amount of granulated sugar to a quarter of a cup because the fruit is so tart.  If you are using bottled juice, I would omit most of the sugar but taste the mixture before you freeze it and adjust as necessary.

Grapefruit Sorbetto
Adapted from A16 Food + Wine

1/8 cup granulated sugar
1 tsp. powdered pectin
Juice of one fresh grapefruit
3 1/2 cups bottled grapefruit juice
1/4 cup light corn syrup
1 tbsp. lemon juice, preferably fresh

Combine the pectin and granulated sugar in a small bowl and stir.  In a small pot over medium heat, combine the corn syrup and 1 cup of grapefruit juice.  Heat to a simmer, then whisk in the sugar-pectin mixture.  Keep whisking until the pectin is dissolved, about two minutes.

Remove the pot from the heat and set aside.  In a medium bowl, combine the remaining grapefruit juice with the lemon juice.  Bit by bit, whisk in the hot sugar mixture.  Keep whisking until the mixture is smooth.  If you are using fresh grapefruit juice, you may wish to strain the mixture at this point to ensure the seeds and pulp are removed.

Chill the mixture in the refrigerator until completely cooled, then whisk it again and pour into the prepared bowl of your ice cream maker.   Churn for about half an hour, or until the mixture is completely smooth.

Eat immeidat

Tuesday, March 27, 2012

Under the Table

What would it be like to grow up in a restaurant?

And I mean literally grow up in a restaurant, where your father is the chef, your mother is the pastry chef and all the servers give you maraschino cherries and bring you little plates of food as you sit in the dining room doing your homework.

I'm fascinated by restaurants and their culture.  Charlotte Silver's Charlotte au Chocolat:  Memories of a Restaurant Girlhood chronicles the years in which her parents and then her single mother (I'm not giving away any major plot points here, I promise) owned the restaurant Upstairs at the Pudding in Boston's Harvard Square.  The restaurant, in a crumbling, Harvard-owned building, is above the famous Hasty Pudding club, which every year crowns celebrities Man and Woman of the Year and puts on a famous annual show that always features men in drag.

It makes for a fascinating setting, but what is more interesting is how restaurant life is perceived through the eyes of a girl.  For many chapters, it seems that she is the Alice in Wonderland of the restaurant world, crawling under tables and scaring customers, sitting in prim little party dresses for the amusement of the same customers and eating the fabulous desserts that her mother makes.  School nights and normal bedtimes don't really come into consideration.

When Silver described the swagged dining room with its pink accents, I couldn't help but think of a certain class of restaurants from a bygone era.  For many chapters, I thought that the time frame was in the 1950s through the 1970s--up to the point where I realized that Silver was younger than me.  The restaurant closed in 2001 after a lease dispute with Harvard, although a version of it reopened elsewhere--minus the unique atmosphere of the original.

While Silver isn't a great writer--the book is repetitive in spots--I admit that I was fascinated by her childhood.  It lacked structure and was constantly chaotic, but I wanted to be that little girl hiding under tables, stealing bites of her mother's famed charlotte au chocolate dessert, after which was was named, and speaking Spanish with the revolving cast of waiters.  I wanted to be this version of Alice in Wonderland.

It's a short book, but an appropriately sweet one for anyone interested in a unique perspective on restaurant culture.

Thursday, March 22, 2012

Bit o' Honey

This week would have been kind of comical had it been someone else's life.  Let me count the way that things have gone wrong:

Eleemosynary:  Looked so good last week, total nightmare this week.  The set carpenter hasn't shown up for two days and one of the actors has taken it upon herself to declaim that she doesn't like the set or her costume.  Le sigh.

Deposition:  I went to Oregon Tuesday night, a trip that was ill-timed to begin with, to take a deposition on Wednesday morning.  Cue freak snowstorm that shut down parts of Oregon, including the one where the person I was deposing had to travel from--deposition cancelled.  The trip was all for naught.  Le sigh again.

The new living room furniture arrived--good news--and requires assembly.  However, the couch box wouldn't fit through the front door and the couch is in pieces in the garage.  In the meantime, my mother-in-law Hope arrives next week and David is going on a business trip.  See the problem?

I need a good night's sleep, enough time to exercise, a good opening night and perhaps a Valium.  Maybe not in that order.

Enough with the kvetching.  As part of my marathon cooking therapy session (I'm making that up, but maybe there should be such a thing) last weekend, I made gelato.  Our old ice-cream maker died an ignominious death a while ago, and we weren't motivated to replace it until a particularly unfortunate incident last month when the gorgeous vanilla ice cream base fully refused to freeze despite hours in the ice-cream maker.

But I didn't want ice cream:  I wanted gelato.  That's right, I'm dreaming of an Italian vacation that is two months away. 

This is a very basic gelato recipe that seems more or less fail safe.  The only word of caution is to use good-quality honey, because you really can taste it.  I used a clover honey, but next time I will use fireweed honey, which is flavored with the quintessential Alaska flower/weed that blooms everywhere in the summer.  Lavender honey would also be gorgeous.


Honey Gelato
Adapted from A16 Food + Wine

3 3/4 cups whole milk
1/4 cup heavy cream
1 tbsp. plus 1 1/2 tsp. cornstarch
1/2 cup light corn syrup
1/4 cup granulated sugar
1/2 tsp. sea salt
1/2 cup clover honey

Follow the instructions for your ice-cream maker;  the bowl of mine needs to be frozen overnight and this base needs to sit overnight, so start your prep the night before.

In a medium saucepan, combine the milk and cream.  Transfer three tablespoons of this mixture to a a bowl and stir in the cornstarch.

Heat the saucepan over medium heat until it comes to a boil.  Whisk in the cornstarch mixture, corn syrup, granulated sugar and sea salt.  Allow it to boil again, whisking often.

Strain the milk mixture through a cheesecloth or very fine sieve to remove any solids and stir in the honey.  Let the mixture come to room temperature, then cover with plastic wrap and refrigerate overnight.

When you're ready to make the gelato, give the mixture a good stir and pour into the bowl of the ice-cream maker.  Process until the mixture is the consistency of soft-serve frozen yogurt, then remove the bowl from the maker and return it to the freezer.  It will harden a bit more, but not much.

Makes approximately 1 1/2 quarts gelato.

Tuesday, March 20, 2012

Gluten-Free and Fabulous

Thanks to everyone for their get-well wishes for my cat, Ingrid.  The good news is--how do I put this delicately on a food blog?--she is not hopping off the bed every morning at 5:30 a.m., howling pitifully and then--er--losing the contents of her stomach on the bedroom carpet.  Was that delicate enough?  We'll know more about how she's reacting to the medication in the next couple of weeks.

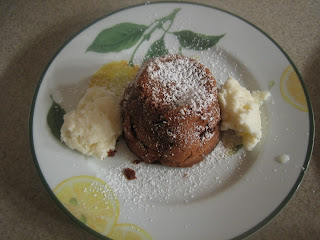
Rejoining the Cake Slice bakers after a month off, I have to sing the praises of these little chocolate cakes.  Admittedly, they were supposed to be molten chocolate cakes, but even with baking according to the letter of the instructions, there was no melting going on.  Rather, I would describe these as little souffle cakes with a slightly brownie-like center.  A list of their many fine qualities:

1.  They don't contain any flour.  This is the cake to make your friends who can't eat gluten.  Or for Passover, which is coming up quicker than I care to think about. 

2.  You already have all the ingredients.  A word on chocolate:  this is not the place to use your fancy, expensive chocolate.  My fellow Cake Slice bakers warned that the original all-bittersweet recipe was, well, just too bitter.  I like dark chocolate better than anyone, but I heeded the warning and used a combination of semi-sweet Baker's chocolate and part of a big Hershey bar that for reasons that pass understanding has appeared in my pantry. 

3.  You can make the batter ahead.  I made the batter and put it in the fridge for six hours before baking up the cakes.  No problem, just bring the batter to room temperature before baking.  It'll take you that long to preheat your oven anyway.


On top of that, the cakes were delicious, and not too sweet.  I served them with a side of honey gelato, the recipe for which will appear later this week.  Good vanilla ice cream would work just as well. 

This recipe can be easily doubled;  I cut it down because it was just for David and I.  We ate the leftover cake the next morning and it was more brownie-like, but equally delicious.

Individual Warm Chocolate Cakes
Adapted from The Cake Book by Tish Boyle

3 ounces semi-sweet chocolate, chopped
1.5 ounces milk chocolate, chopped
2 tbsp. unsalted butter, cubed
1/4 cup sugar
2 large eggs, separated
1/16 tsp. salt (basically just a pinch)
1/8 tsp. cream of tartar

Spray three six-ounce ramekins (or coffee cups, in my case) with baking spray with flour or butter them generously;  set aside.

Preheat the oven to 375 degrees.  Using a double boiler, melt the chocolate and butter over simmering water.  When the mixture is completely melted, remove from the heat.  Whisk in half the sugar, then the egg yolks.

In a small bowl, beat the egg whites and salt with an electric mixer.  When the whites are foamy, add the cream of tartar and beat at medium speed until the whites are at the soft-peak stage.  Then add the remaining sugar and beat the whites to stiff peaks.

Fold a third of the whites mixture into the chocolate until combined, then incorporate the rest of the whites bit by bit. 

Divide the mixture among the prepared ramekins/cups and place them on a baking sheet.  Bake for approximately 15 minutes, until the tops start to crack.  Watch closely because overbaking will mean no molten center.

Cool the cakes for a minute on the baking sheet, then run a knife around the edges to unmold.  Unmold immediately on the serving plate and garnish with powdered sugar and ice cream.

Makes three individual cakes.

Monday, March 19, 2012

King of All He Surveys

Today I actually uttered the phrase "hold the phone." 

I love my adopted home state of Alaska, but sometimes its little oddities still surprise me.  Like the fact that the mayor of Talkeetna is a cat.

Yes, you read that right.  A cat.  His name is Mr. Stubbs, he's an orange tabby with a stub of a tail (hence the name) and he rules over Talkeetna, population 860.

Photo from Nagley's General Store, http://nagleysstore.com/Storecats.html
If you're not familiar with the odd but wonderful town of Talkeetna, it is the usual jumping-off point to climb Denali, a/k/a Mt. McKinley--though if you call it McKinley, Alaskans will know you're not from here.

Personally, I think he's got a lot of gravitas.  I've seen less likable politicians.

Thursday, March 15, 2012

Bad News/Good News

It's been such a mixed bag of a week.  It started with the friend who was behaving so awfully last fall suddenly deciding that he wanted to reconcile, for the oddest of reasons--still don't know what to do about that one--and then progressed to my beautiful old cat Ingrid being diagnosed with hyperthyroidism yesterday.  For those who have not had the experience of pilling a cat, it's a sight to be seen.

It's not a great photo, but just look at that face.
The good news is that the Eleemosynary cast, all three of them, put down their scripts yesterday and it turned out that they all knew their lines.  What could have been a train wreck of a rehearsal turned into my gushing at them about how wonderful they are.  We still have two weeks' worth of hard work to do before opening, but I am optimistic.

The other piece of good news is that it looks like we are headed back to Italy this year.  If you have restaurant recommendations for Rome, Verona or the regions of Alto Adige and Emilia-Romagna, please let me know.

Because I'm here to tell you:  I need a vacation, not to mention some good Italian food.

There are several things I always try to keep in my pantry, because it seems every savory dish is improved by them:  olive oil, lemons and shallots.  Those three things make a great salad dressing by themselves, but they also dress up simple side dishes, like these roasted green beans.


This healthy side dish could be varied with whatever nuts you have in your pantry, but buttery cashews add a great crunch and hit of salt.  It goes together in less than 10 minutes, and the combination of soft and crunchy is out of this world.

Roasted Green Beans with Shallots and Cashews
Adapted from Gourmet Magazine, February 2009

1 1/2 lbs. green beans, trimmed at the ends
1/2 cup salted cashews, roasted and chopped
1/3 cup shallots, chopped coarsely
1 1/2 tbsp. extra-virgin olive oil
Pinch of finely-ground black pepper

Preheat oven to 500 degrees--you will want to cook these in the lower part of the oven to prevent scorching.

In a medium bowl, combine all of the ingredients and toss to coat thoroughly.  Spread evenly on a large cookie sheet with sides.

Roast until the beans are thoroughly tender and starting to turn brown, about 20 minutes.  Stir often to make sure that the shallots aren't sticking to the pan or burning.

Serves four as a side dish.  We served with a gorgeous medium-rare steak, but the late lamented Gourmet recommended this as a side for roast chicken.

Tuesday, March 13, 2012

Tea and Strumpets

Sunday morning dawned clear and cold, with the rare appearance of the Alaska sun.

Despite the dreaded "spring forward" time change, I leapt out of bed and ran downstairs to start baking.

The occasion?  Tea and strumpets.

Yes, you read that right.  I do not mean tea and crumpets.  My friend Arlitia was holding a small tea party for a pretty kick-ass group of women at her house that morning.  Her tea selection was startling:

I wish I could tell you I tried the red velvet chocolate variety, but I didn't.  Everyone brought tea-type food, and Arlitia made three incredible varieties of scones, and several types of tea sandwiches.

She lives in the area of Anchorage called the Hillside, which is built up into the mountains just before you leave Anchorage on the Seward Highway.  You could see the water of Turnagain Arm and higher up into the mountains.  On a clear day, it's a spectacular view.

 
It's been a chaotic couple of weeks, so it was awesome to sit down with some friends and catch up for a few hours.  I don't know if I've said that I'm midway through production on another directing project, the gorgeous but complicated play Eleemosynary.  As of last weekend, I'm also designing the sound.  More on that in the next post, but in the interim, my contribution to the tea party:
 
I'm sure most bakers have a decorative mini bundt pan, which probably never gets used.  Or, at least, mine are almost never used, because I have two:  one shaped like rosettes and one shaped like maple leaves.  I used both to make miniature tea cakes, because portion-sized desserts are the only way to go for a tea that started at 11 a.m.  You may feel guilty carving into a full-size cake at that hour, but it's no big deal to pick up a mini-cake.


This recipe also makes one full-size bundt cake, although it will require a longer baking time. 

Chocolate-Hazelnut Tea Cakes
Adapted from All Cakes Considered by Melissa Gray

3 1/2 sticks salted butter (yes, you read that right), at room temperature
1 1/2 cups granulated sugar
6 large eggs
2 cups powdered sugar
2 1/4 cups all-purpose flour
3/4 dark unsweetened cocoa
1 cup chopped hazelnuts

Powdered sugar for garnish, if desired

Prepare two mini-bundt pans with baking spray with flour, making sure to coat all the details in the pan with spray.  Preheat the oven to 350 degrees.

Cream the butter using a hand mixer on medium speed, gradually adding the granulated sugar.  The mixture will be pale yellow and fluffy.  Add the eggs one at a time, beating well after each one. 

Slowly add the powdered sugar, and beat until just blended.  Set the mixer aside and incorporate the cocoa and flour by hand using a wooden spoon.  Stir in the chopped hazelnuts.

Dollop the batter into the pans--it will be thick and sticky.  Try to smooth the batter;  you will likely end up with "crowns" on the cakes that will need to be trimmed.

Bake for approximately 40 minutes, or until a tester comes out clean.  Cool the pans on a baking rack for half an hour;  then tip the pans over to unmold.  Cool for another 20 minutes or so;  dust with powdered sugar if desired.


Makes approximately 24 tea cakes, depending on the size of your pans.


Tuesday, March 6, 2012

Wanderlust and Garlic Bread

The last Friday in February, the book group met to discuss Wanderlust by Elisabeth Eaves.  The nonfiction story of a woman who realizes in high school that she has an irresistible itch to travel would not seem to be controversial.  The fact that she was incapable of doing so in the absence of a love interest in every locale was.

This book group is a fabulous circle of professional women--some originally from Alaska, one from New York, one from New Orleans--Alaska is fascinating in that sense, because maybe a quarter of the people I meet are originally from here.  We span a diverse group of ages, ethnicities and experiences, but we were all united in one respect:  none of us wanted to travel with this woman. 

Check out those fabulously colored rice cakes in the background, from one of
the three Korean bakeries in Anchorage.  Three?!?  Who knew?
I loved her writing, and as someone who has done more traveling in the last three years than in the previous (ahem) thirty-five, I understand the urge to hear different languages, immerse oneself in different cultures and be completely peripatetic.  However, must she act like an ugly American?  And why does finding herself mean that she has to pick up a different man in every location?  (I'm totally serious here.  In the second half of the book, I couldn't keep track of which guy she was talking about.)

In the end, the book was pretty much roundly denounced and the conversation turned to what made a great travel companion.  Well, that and the international variety of snacks that everyone brought in keeping with the book's theme.

So...garlic bread.  It's the humblest of foods, but I never want to eat another storebought loaf coated with what seems to be garlic-flavored Crisco.  I generally avoid it altogether in favor of roasted garlic cloves smeared on bruschetta.  However, Lidia Bastianich's garlic bread is simple, quick and feeds a crowd.  She has three variations in her book, one of which is a take on pan con tomate, but needless to say I'll wait until the tomatoes in Alaska look a little better before I try that one.

Garlic Bread Two Ways
Adapted from Lidia Bastianich's Italy in America

1 large loaf Italian bread, halved lengthwise and cut into twelve pieces
3 tbsp. good-quality olive oil
3 cloves garlic, minced
1 tbsp. parsley flakes
1/2 cup Pecorino Romano, finely shredded
1 tsp. red pepper flakes (optional)

Combine the minced garlic and olive oil and allow to steep for half an hour.

Preheat the oven to 400 degrees.  Spray a large baking sheet with nonstick cooking spray and arrange the bread pieces on it., crust side down.

Using a basting brush, brush the pieces thoroughly with the garlic oil.  Sprinkle half the pieces with the parsley and red pepper flakes, and the other half with the cheese.


Bake for five to eight minutes, until the slices are lightly browned.  Serve immediately.

Sunday, March 4, 2012

A Person Could Develop a Cold

I told you so.

Specifically, I told you that the trip to Fairbanks was the straw that broke this traveler's back.  I, who am never sick, have a cold.  A sinus-dripping, reddened-nose kind of cold. 

Miserable.

The only good thing about this is that it has led to my being home more than expected this weekend, which in turn has led to cooking.  Fortunately, I am not feeding anyone other than David (who has the same cold), so the odds of contaminating anyone with my germs are minimal.

The Great Focaccia Experiment of 2012 is continuing, with yesterday's batch with olives and rosemary--for the basic recipe, go here--and while I was going through some old magazines, I found this one.  The green onion and mustard flavors are subtle and incredibly tasty, an assessment which I trust will hold when the cold clears.

The recipe was written to be cooked on a grill, but it adapts easily to an oven.


Mustard-Crusted Chicken with Green Onions
Adapted from Bon Appetit Magazine, August 2010

1 small bunch green onions, chopped
1/4 cup Dijon mustard
1 tbsp. fresh-squeezed lemon juice
2 large garlic cloves, minced
1 tbsp. olive oil
6 large chicken thighs, with skin
2 tbsp. fresh breadcrumbs, toasted

Preheat the oven to 400 degrees.  Stir together the first five ingredients in a small bowl.  Place the chicken thighs in a baking dish skin side up.  Brush them with olive oil and then coat with the mustard sauce.

Sprinkle with the bread crumbs and cover the dish with aluminum foil.  Cook for 25 minutes and then either slice into a chicken thigh to check for doneness or use a meat thermometer--chicken is done when it registers 165 degrees on a meat thermometer.


Thursday, March 1, 2012

For the Love of Bread

I am toast.

In the past four days, I have criss-crossed the country for work, racking up something like 8,500 flight miles and spending about thirty hours in either the air or airports. 

Ironically, it was the shortest piece of the travels, a mere 500 miles to Fairbanks and back yesterday, that really did me in.

Business travel isn't fun, but it doesn't particularly bother me either.  I missed the Oscars and my friends' Oscar party for the first time in years, although I did manage to win the Oscar pool in absentia.

Before I left, though, David and I had dinner with my friends Sondra and Stephan, who have a new baby.  This involved our making dinner at our house, packing up a small catering operation and hauling it down the road to their house.  We wanted to leave them with enough food for another meal, since their lives are so hectic right now.


One of the dishes I made was a classic focaccia alla genovese--focaccia from Genoa.  I can't help but note that when we went to Italy last year, David was dead set against going to Genoa, which is a large port town.  It isn't as flashy or famous as a lot of Italian cities, but the museums are fantastic and we had some very good food.

To speed up the process of making this bread, I turned the oven on to its lowest temperature (170 degrees) just prior to each of the bread rising periods.  I then turned the oven off when I put the bread in to proof and rise.  It sped up the process by a good hour, and the texture of the bread was fantastic.

I was sad to have left the rest of the bread behind, because I would have loved to pack a focaccia sandwich for my travels. 

Focaccia Alla Genovese with Thyme
Adapted from the CIA's Italian Cooking at Home

1 cup 2 percent milk
1 tsp. sugar
1 envelope active dry yeast
4 cups all-purpose flour, plus more for shaping bread
3/4 cup warm water
5 tbsp. good-quality olive oil
1 tsp. kosher salt
1 tbsp. thyme, chopped
1 tsp. coarse flaked sea salt

Warm the milk on the stove or in the microwave to 100 degrees--I used a candy thermometer to monitor the temperature.  Cool the warmed milk for a minute, then add the yeast and stir to dissolve.  Set aside for about fifteen minutes;  it should begin to foam.

In a stand mixer using the dough hook attachment, combine the flour, two tablespoons of olive oil, the yeast mixture, the water and the kosher salt.  Mix on medium until the dough is smooth and elastic, about five minutes.

Warm your oven.  While it is warming, take the mixer bowl off the mixer, dust the top of the dough with all-purpose flour and seal tightly with plastic wrap.  Turn off the oven and place the bowl in it.  Let the dough rise until it is about doubled, about half an hour.

Flour a work surface and tip the dough onto it.  Using your hands, shape the dough into a rough square, then bring each of the corners to the center.  Turn the dough over and tuck the ends in so the dough is circular.  Cover loosely with plastic wrap and leave it on the counter to relax, about half an hour.

While it is relaxing, preheat the oven again.  Prepare your baking pan--I used a small paella pan, which worked perfectly.  Brush the pan with two tablespoons of olive oil, include the sides.  Then pat the dough into the pan using your hands.  Turn off the oven, cover the plan loosely with plastic wrap and allow the dough to rise one more time.  This should take 30-40 minutes.

Remove the pan from the oven and preheat to 500 degrees.  Press fingers lightly into dough to create dimples in it.  Combine the remaining tablespoon of olive oil and thyme and allow to steep while the oven is heating.  Then brush the bread with the oil and sprinkle the flake sea salt on top.


Bake for 10 to 12 minutes, until the bread is a light golden brown.  Remove from the oven, cool slightly and cut into wedges.

Makes 10 to 12 good-size focaccia wedges.