Food Buzz Badge

Tuesday, July 31, 2012

Shorthand It

I hate when I've gone a week between posts--which I never mean to do, but life happens--because it means that there is too much to catch up on.  It makes me think of a scene from Will and Grace, a show I used to love.  Will and Grace had a fight, they want all the drama to be over, but don't want to go through a big, emotional, apologetic conversation.  Grace says, "Let's shorthand it."  They both laugh for a second, fake-cry for a second, hug and the fight is over. 

If only.

So let me shorthand it--here are the bullet points:
  • On Golden Pond is finally cast, and I'm really pleased with everyone involved. 
  • David managed to fracture and displace one of his ribs in a mountain biking accident last weekend, plus sprain his right wrist.  He'll be fine, but he's a little helpless right now.
  • My parents are in town for their annual visit.
  • I had one of the longest depositions of my career last Friday, in which opposing counsel beat up on my psychiatric expert and was just a total jerk.
You would think that the last one wouldn't surprise me at this point, but I work in such a specialized field that I see about the same thirty lawyers over and over again.  The vast majority of them manage to be totally civil while disagreeing with each other.  I think the motivation to be nice is that we're all going to see each other again, so don't want to piss each other off.  This guy was not one of the thirty people I usually see, and obviously was not advised about the civility rule.

I have two more depositions with him in August.  Give me strength.

Last week I posted the crisp green salad with quinoa that I served with Nigella's salmon.  Salmon fishing is at its peak in Alaska right now--friends keep bringing home upwards of twenty fish and we're often the lucky recipients of extra fish.  This recipe is dead simple--portion the fish, pat it dry, dunk in seasoning and then pan fry.  Couldn't be easier.

Seared Mustard-Crusted Salmon
Adapted from Forever Summer by Nigella Lawson

2 tbsp. olive oil
1 tsp. granulated sugar
1 1/2 tbsp. crushed mustard seed or powder
4 6 oz. fillets of salmon (the recipe calls for skinless, but I left the skin on)

Preheat a large skillet over medium heat.  When the skillet is warm, add the oil. 

In a shallow bowl, mix together the sugar and mustard.  Dredge the fish in it--if you are using skinless fillets, dredge it on both sides.

Throw a plate in the oven to warm.  Then add the fillets to the skillet and cook for three minutes on each side.  If you are using fillets with skin, start with the skin facing up.  You might want to check one of the fillets at the six-minute mark to make sure it is cooked through, although this recipe is meant to keep the salmon juicy and slightly opaque. 

Remove to the warmed plate and serve with last week's greens and quinoa.  Makes a lovely summer dinner for four.

Tuesday, July 24, 2012

Here Comes the Sun

The sun is out!

This wouldn't be such an occasion for celebration were it not for the fact that it has been gray and rainy since last Friday night.  My hiking shoes and I will be heading out after work.

Despite the gloomy weather, I haven't been cooking much over the past couple of weeks.  Part of it is the casting process for On Golden Pond, which sadly remains ongoing as I seek out the last person, plus long hours at work, but part of it is that I've been wanting to eat basically two things:  Mexican food and salad.

There have been lots of blogs lately extolling the virtues of quinoa, a chewy little grain that takes on the flavors with which it's surrounded.  I have nothing but love for it, especially since it's kosher for Passover (a huge discovery this year) and a complete protein.  It's good hot or cold, and pairs particularly well with summery fish dishes.

This salad would make a light main course or a perfect side--I served it with Nigella's mustard-coated salmon.  I've doctored it up to add some additional color and crunch from radishes.  The ones we get in Alaska are vividly colored and very peppery, and I can't resist them.  We ate this salad outside on a sunny night with a bottle of Italian white wine.

Quinoa Salad with Greens and Spring Onions
Adapted from Salad as a Meal by Patricia Wells

For the salad:
1 1/2 cups quinoa
3 cups vegetable or chicken stock
2 dried bay leaves
1 tsp. coarse sea salt
1 tbsp. lemon juice
2 cups parsley leaves, coarsely chopped
1 tbsp. good olive oil
3 small spring onions (or scallions, if spring onions aren't available)
5 oz. baby spinach
4 radishes, sliced thinly

For the dressing:
2 tbsp. lemon juice
1/2 tsp. coarse sea salt
1 cup 2% milk
1/3 cup chives, minced
Lemon zest

Toast the quinoa in a large saucepan over medium heat, shaking or stirring it regularly until it crackles, about five minutes.  Remove the quinoa from heat and rinse it in a sieve with cold water.

Return the saucepan to the stove and heat the stock to a boil.  Add the quinoa, bay leaves and salt, then reduce the heat.  Cover the saucepan and simmer for about 15 minutes, stirring occasionally.  Taste the quinoa to see how chewy it is and cook for an additional five minutes if it isn't soft enough.

Remove the quinoa from the stove and allow to sit for an additional ten minutes.  While it is cooling, whir the lemon juice, parsley and olive oil in a mini-prep food processor until the parsley is very fine.  Pour this mixture into a small bowl and add the spring onions and radishes to marinate them.

Then make the dressing:  in a jelly jar with a lid, combine the lemon juice and salt and shake to combine.  Let sit for a minute to dissolve the salt, then drizzle in the milk.  Shake to combine, then add the chives and lemon zest.  This will make more than enough dressing for this dish--you could halve the recipe if you don't want leftovers.

Doesn't this look like the best brown-bag lunch?

When ready to serve, toss the baby spinach with enough dressing to coat the leaves but not leave a lot of extra.  Then combine the quinoa with the marinated vegetables.  The original recipe calls for these two mixtures to be combined, but I left them separate--all the better to keep the spinach fresh for leftovers. 

Makes four main course servings, and would easily serve six as a side.

Friday, July 20, 2012

Start with the Basics

I've been in the casting process this week for the next play I'm directing, On Golden Pond.  Do you know the movie?  It had Katharine Hepburn and Henry Fonda as a couple in their late 70s who return to the same rural cabin in Maine every summer that they bought when they were newly married.  That's really about it for the plot, except for a subplot concerning their adult daughter and her difficult relationship with her father.
The movie came out when I was nine or ten, and I loved it.  What nine-year-old loves On Golden Pond?  I think mostly it was because I was obsessed with Katharine Hepburn.  As an aside, do you know if you type the name "Katharine" into Google, the first entry is for Katharine McPhee, who was on American Idol, and not Katharine Hepburn?  That just seems wrong.

Most people are nervous when they come audition.  The thing they don't know is that I'm nervous, too, because I really want to find the right people. 
It's a little like having the right ingredients--if the basics are solid, it's much harder to screw up the end product.
This month's Cake Slice pick didn't initially interest me--a loaf cake of frozen mousse sandwiched with chocolate wafers.  However, the mousse is simple and delicious.  I made a few adaptations to use coffee rather than espresso beans, and Kahlua rather than Frangelico because I don't think I've ever had Frangelico in the house.
We served it for the Bastille Day dinner, and it was delicious.  Better yet, I was able to make it a day ahead of time and didn't have to worry about it the day of the dinner party.
Frozen White Chocolate-Espresso Loaf Cake
Adapted from The Cake Book  by Tish Boyle
1/4 cup water
1 1/2 tsp. powdered gelatin
2 1/4 cups heavy cream
1/3 cup ground coffee
9 oz. good-quality white chocolate chips (I used Ghirardelli)
2 tsp. vanilla
1 tbsp. Kahlua liqueur
Nabisco chocolate wafers
Line a large loaf pan with plastic wrap, ensuring that the ends of the wrap hang out of the pan.
To make the mousse, pour the water in a small coffee cup and sprinkle the powdered gelatin over it.  Let it sit for five minutes.  In the interim, make a small sachet out of cheesecloth (I used an old linen tea towel) and put the ground coffee in it.  Place the sachet and 1/2 cup of the cream in a small saucepan.  Bring the cream to a boil, then remove the pan from the heat and set it aside for at least fifteen minutes.
Place the coffee cup in the bottom of another small saucepan or skillet and add water until it comes halfway up the side of the cup.  Bring the water to the boil and stir the gelatin until it is totally dissolved.  Then turn off the heat and set the pan aside.
Remove the coffee sachet from the cream, squeezing it to release excess liquid.  Put the saucepan back on the heat and let it come to a boil.  Put the chocolate in a medium bowl, then pour the hot cream and gelatin over it.  Whisk the hot liquid into the chocolate until it is completely melted, then whisk in the vanilla and Kahlua. 
Let the chocolate mixture cool.  Then pour the remainder of the cream in a medium bowl and whip it to the soft peak stage using a hand mixer on medium speed.  Fold in the white chocolate mixture in three installments.
To make the cake, pour about one and a half cups of the mousse over the bottom of the loaf pan and smooth it.  Spread one of the chocolate wafers with a dollop of the mousse and press it against the long side of the pan.  Continue placing the chocolate wafers in rows in this same manner--you may need to break wafers in half to get to the end of the pan. 
When you put the second row in, make sure the wafers are sandwiched against the first row.  Continue until you have put it as many rows as possible, then carefully pour the remaining mousse in and spread it evenly.  Cover the pan with plastic wrap, ensuring that it is touching the mousse.  Freeze for at least four hours, or overnight.

To unmold, lift the edges of the plastic wrap.  Cut into 3/4 inch slices and allow them to stand a few minutes at room temperature before serving.
Makes approximately ten slices.

Tuesday, July 17, 2012

Bastille Day

Thanks to everyone who entered the olive oil giveaway last week.  After searching for a random number generator, I found one on random.org--who knew there even was such a site?  The winner is Nami from the terrific blog Just One Cookbook.

Yes, we have a French flag. 
David is obsessed with flags.
My friends Scott and Kathy used to celebrate Bastille Day every year--sadly, they've deserted Alaska and moved to Kentucky, but this year David and I hosted a small Bastille Day dinner to keep the tradition strong.

Since it's been chilly and rainy here in Anchorage, David made Julia Child's beef bourguignon and ratatouille, and I whipped up a frozen white chocolate mousse dessert (coming Friday!) and some savory madeleines.

You read that right.  Savory madeleines. My mouth waters just thinking about them.

We had two couples over for dinner, so David proposed that I halve the original recipe because two madeleines per person sounded like enough.  I refused, which was the right decision.  These little suckers are good, and there wasn't a leftover madeleine to be had.

If you don't have a madeleine pan lying around, the recipe suggested a mini muffin tin--not a bad idea, though obviously not as pretty.

Make sure that your pear is really ripe--mine was not quite there, and had less flavor as a result.

Blue Cheese, Pear and Hazelnut Madeleines
Adapted from Chocolate & Zucchini by Clotilde Dusoulier

1 1/4 cups all-purpose flour
1 tbsp. baking powder
3 large eggs
1/2 tsp. sea salt
3/4 tsp. fresh-ground black pepper
2 tbsp. olive oil
1/2 cup buttermilk
3 oz. blue cheese, finely crumbled
1 ripe pear, cored and diced
1/3 hazelnuts, chopped

Preheat the oven to 350 degrees.  Whisk together the flour and baking powder in a small bowl and set aside.  In a larger bowl, whisk together the eggs, salt and pepper, then add the buttermilk, oil and crumbled cheese.

Whisk the dry mixture into the wet one until just combined, then fold in the pear and hazelnuts.

Spritz your madeleine pan thoroughly with baking spray with flour, and then fill the molds two-thirds of the way full with batter.

Bake for about sixteen to eighteen minutes, or until a toothpick inserted into one of them comes out clean.  Cool for a few minutes on a baking rack before unmolding.

Makes twenty-four madeleines. 


Thursday, July 12, 2012

An Embarrassment of Riches

Let me begin by saying:  I am not much into cutesy.

Crab is everywhere right now:  fresh boiled crab legs served simply with butter, crab omelets, and something called "Tabby's Crabby Patty."  Please note that the last one is at one of the best restaurants in town.

It may be very good, but I can't get past the name.

Summer in Alaska is an embarrassment of riches when it comes to fish and shellfish.  I won't claim that crab is cheap here, per se, but you can get decent deals on fresh frozen crab legs.  It's a luxury item that's brought back down to earth a little, at least for special occasions.

David and I were invited to a potluck of sorts at a friend's house on the Fourth of July.  Since the Fourth was in the middle of the week, I was feeling anxious about being out of the office, plus I was a little sunburned (not a good look for me--and I'm vigilant with sunscreen!) and generally cranky.  I didn't feel like making that much of an effort, to be honest, but I'm too persnickety to take food that I'm less than proud of to a potluck.

Enter this luxe-looking spread, which looks more complicated than it is.  It takes maybe fifteen minutes to put together, and that's only because you have to shell the crab.  I've tweaked the recipe from how it is originally written because the crab/butter ratio was off.  Also, learn from my mistake and chop the crab a bit finer than you see here.

As an aside, I had a great time at the potluck.  Sometimes it's just hard to leave the house to socialize when I'm in a mood, but I'm always good when I get there.

Before I get to the recipe, don't forget to comment to win a bottle of very good olive oil, my treat--just go here and leave a comment.  I'll randomly choose a comment left by 6 p.m. on Sunday.

Potted Crab Spread
Adapted from Bon Appetit Magazine, April 2012

2 lemons, zested and juiced
2 tbsp. cooking sherry
1/2 cup good quality unsalted butter, softened
1/8 tsp. cayenne pepper, or more to taste
Kosher salt and fresh-ground black pepper
6 oz. lump crabmeat, chopped coarsely but in relatively small chunks
Fresh chopped parsley (optional, but would give it great color)

Boil lemon juice and sherry in a small pan over medium-high heat;  it should reduce to just over a tablespoon.  Set this aside and allow it to cool.

Using a mini-prep food processor, blend the butter with the zest, cooled juice mixture and cayenne pepper until smooth.  Add the zest to taste, then transfer the butter mixture to a small bowl and fold in the chopped parsley (if used), salt and pepper to taste.  Add a bit more cayenne if you like.

Using a small spatula, fold in the chopped crab.  Divide the spread into two ramekins or other serving dishes, then smooth the tops and cover with plastic wrap.  Chill for at least an hour;  you will then need to bring it up to room temperature to serve.


Serve with buttered toasts or your favorite cracker--steer away from strongly flavored crackers to allow the crab flavor to shine.

Makes about one and a half cups of spread.

Tuesday, July 10, 2012

Happy Anniversary To Me

A year ago, I started this blog.  When I looked back at those initial entries not too long ago, I realized that they sounded stilted--the tone was just off.  I'm still finding my way, but I wanted to say "thanks!" to all those who have read and commented on this blog over the last year.

And as a token of my thanks, I will be giving away this:

Photo courtesy of the Williams-Sonoma website.

This started as an Italian food blog and still has that bent, so it seems only right to give away a gorgeous bottle of extra-virgin olive oil from Williams-Sonoma.  On a separate note, thank goodness I do not live anywhere near a Williams-Sonoma, because I would be in there every week.

To enter, please sign up to follow this blog with Google Friend Connect if you don't already, and leave a comment letting me know that you have.  If you're already following me, you can let me know that too.

Since my blog lives in a cave and doesn't have a Twitter feed or Facebook page, if you can't sign up to follow let me know what Italian recipe you'd like to see me tackle next.

I will select a comment at random this Sunday at 6 p.m. Alaska Standard Time, and this gorgeous bottle of oil will be shipped to you!

Thank you again for a great year.  Back tomorrow with a recipe for Alaskan king crab dip perfect for your summer parties.

Friday, July 6, 2012

Apron Anxiety

It's always interesting when food bloggers reach national  prominence.  Some of them rise to the top by just being great writers who cook appealing and approachable food, a la Orangette or Pioneer Woman, both of whom seem to be universally loved in the food blogging community.  And then there are the ones who irk most food bloggers, like Julie Powell.

I can't decide how I feel about Alyssa Shelasky, a/k/a Apron Anxiety, who has a sassy personality and a girlfriend's gift of flowing gab but who is also well-connected and sometimes feels as if she is name dropping.  A former writer for People Magazine who finagled a meeting with a Top Chefs contestant on whom she had a crush, she transplanted her life from NYC to Washington, D.C. (a place she labeled provincial) to she could live with him.

If D.C. is provincial, I can't imagine what she'd think of Alaska.

When she has too much time between freelance assignments, Alyssa teaches herself to cook.  The blog is a mishmash of fun photos (mostly not taken by her), coy storytelling in which she omits nearly everything about her personal life (as if she were saving it for the book) and the occasional recipe.  It's fun, but you wouldn't learn a lot about cooking from it.

The book gives the juicy details of her "relationchef" (relationship with a chef)--his name is Spike, and I have to confess that I don't have cable so don't have a clue who he is.  There are also more details about learning to cook, and I'm not going to lie--it's a fast, fun read, but I really wondered whether she would have received a book deal if she hadn't had her connections.  It's what I would call a good airplane read, but she's like the friend of your spouse that you're glad you only have to see once a year.  She wears out her welcome.


I will credit her blog, though, for leading me to the recipe for Fat Witch's white chocolate raspberry brownies, which are the perfect blend of fruit and chocolate.  They are sticky, and the white chocolate chips drifted to the bottom and stuck, but they are completely delicious.

Any idea how to keep chips suspended in batter as the brownies bake? 

White Chocolate-Raspberry Brownies
Adapted from Fat Witch Brownies by Patricia Helding
14 tbsp. unsalted butter, softened
1/4 cup milk chocolate, chopped or in chip form
1/4 cup plus 2 tbsp. bittersweet chocolate, chopped or in chip form
4 large eggs
1 cup granulated sugar
1 tsp. vanilla
1/2 cup plus 1 tbsp. all-purpose flour
1/4 tsp. salt
1/2 cup white chocolate chips
1/2 cup raspberry preserves, heated slightly to make it spreadable

Preheat the oven to 350 degrees.  Prepare a 9 by 9 baking pan either by buttering it or thoroughly spritzing it with a baking spray with flour.

Using a double boiler or a small metal bowl over simmering water, melt the butter, milk and bittersweet chocolate.  Set aside the mixture to cool.

Whisk together the eggs, sugar and vanilla in a medium bowl, then whisk in the butter/chocolate combination.
Sift together the flour and salt into the mixing bowl, when stir thoroughly to combine.  Add the white chocolate chips and then stir again.

Pour half the batter into the pan, then do your best to spread the preserves over the batter--mine wanted to clump.  Then add the other half of the batter, smooth it so it's even and bake for about 35 minutes or until a toothpick comes out clean.

Cool on a baking rack.  Makes 12 good-size brownies.

Monday, July 2, 2012

Climb Ev'ry Mountain (At Least the Easy Ones)

I love Anchorage in the summer, last post's weather gripes aside.

We had fabulous friends over for dinner on Friday (there was an ill-fated clafoutis incident that I won't bother you with here), dinner with a friend of my parents on Saturday, and then walked past a street fair to meet some other friends later that night.  On nice days in Anchorage, you run into everyone downtown--forget six degrees of separation, it's more like two.

Yesterday David and I went hiking at Falls Creek Trail, which is a very steep uphill trail through trees to a valley at the end.  The state's website says the difficulty is "moderate," which may be true if you're a mountain goat or a Dall sheep.  My pedometer said that the uphill was the equivalent of going up 141 flights of stairs, if that can be believed, and my legs are a little on the sore side today.

A view of Turnagain Arm from
further up the trail.

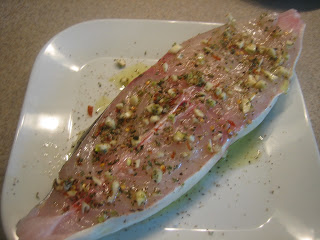
By the time we rolled off the mountain dirty and sweaty, I didn't want to do anything too complicated for dinner.  Halibut tacos are one of the great Alaskan summer dishes--you can find them on menus around the state while the halibut is fresh, and while some restaurants are stupid enough to deep-fry halibut chunks for the tacos, this broiled version is much tastier and healthier.

I sauteed a small red spring onion and half a jalapeno and mixed them with a can of black beans for a side.  Green tomatillo salsa is a perfect complement to the tacos.

Halibut Tacos
Adapted from A Platter of Figs by David Tanis

1 lb. halibut steak or fillet
2 small peperoncino peppers, crushed
2 cloves garlic, minced
1 tsp. dried oregano
Extra-virgin olive oil
1/2 head green cabbage, thinly shredded
1 lime, juiced
Small corn or flour tortillas
Kosher salt and fresh-ground black pepper

For serving:
Guacamole
Black beans
Lowfat plain yogurt or sour cream
Salsa

Pat the fish dry and sprinkle with salt and pepper on both sides.  Preheat the broiler or, if it's a nice day, prepare your grill and cook the fish outside.

Combine the garlic, peppers and dried oregano in a ramekin, then spread on one side of the fish.  Drizzle the fish with olive oil on the same side.  If you have time to marinate the fish for an hour or so, cover it and put it in the fridge.  You'll want to let it come back up to room temperature before cooking.

In a small bowl, toss the shredded cabbage with a little salt, then add the lime juice and toss again.  Set it aside while you're cooking the fish.

Place the fish on a baking sheet and broil on high for about three minutes on each side.  The fish will be done when it flakes into large chunks and is opaque inside. 


Serve with warmed tortillas and garnish with the shredded cabbage and other fixings.

Serves 2 with leftovers.